Maintaining sharp chisels is crucial for woodworking, and honing guides offer repeatability and precision. These tools assist in achieving consistent, professional results effortlessly.
Why Use a Honing Guide?
Honing guides dramatically simplify the sharpening process, especially for beginners. Achieving a consistent angle freehand requires significant skill and practice; a guide eliminates much of the guesswork. They ensure repeatable results, vital for precision woodworking where consistent edge geometry is paramount.
These guides accommodate various chisel types and blade widths, offering versatility. They’re particularly useful for maintaining a specific sharpening angle, crucial for different woodworking tasks. Even experienced woodworkers benefit from the speed and accuracy a honing guide provides, reducing fatigue and improving efficiency. Ultimately, a honing guide empowers you to achieve razor-sharp edges with confidence.
Benefits of Sharp Chisels
Sharp chisels are fundamental to quality woodworking, enabling clean, precise cuts with minimal effort. Dull chisels require excessive force, increasing the risk of splitting wood and causing user fatigue. A sharp edge effortlessly slices through fibers, resulting in smoother surfaces and finer details.
Maintaining sharpness through regular honing, aided by a guide, extends the life of your tools and improves project outcomes. Sharpness enhances control, allowing for intricate carving and joinery. Investing in a honing guide isn’t just about sharpening; it’s about elevating the overall quality and enjoyment of your woodworking experience, ensuring professional-looking results every time.

Types of Honing Guides
Honing guides vary, including side-clamping, roller-type, and combination models. Each type offers unique features for securing blades and maintaining consistent sharpening angles.
Side-Clamping Honing Guides
Side-clamping honing guides represent a straightforward and often economical option for sharpening chisels and plane irons. These guides typically feature a clamping mechanism that secures the blade from the side, holding it firmly in place against the honing stone. They are lauded for their simplicity and ease of use, making them a popular choice for both beginners and experienced woodworkers.
Many users find these guides particularly effective for quick, repeatable work. The clamping action ensures a consistent angle is maintained throughout the sharpening process. While some models may require slight adjustments to ensure a secure grip, they generally provide reliable performance. Simple designs, like the classic Eclipse guide, remain widely available and valued for their durability.
Roller-Type Honing Guides
Roller-type honing guides utilize small wheels or rollers to maintain contact with the chisel blade during sharpening. This design offers a smoother, more consistent movement across the honing stone, potentially reducing friction and heat buildup. Veritas is a prominent manufacturer known for its sophisticated roller-guide systems, providing solutions for various blade types.
These guides often excel at handling blades with curves or irregularities, where side-clamping guides might struggle. The rolling action allows for greater adaptability and precision. While generally more expensive than side-clamping options, the enhanced control and versatility can justify the investment for serious woodworkers seeking optimal sharpening results and a complete sharpening solution.
Combination Honing Guides
Combination honing guides aim to offer the benefits of both side-clamping and roller-type designs. These versatile tools often feature interchangeable components, allowing users to switch between clamping methods depending on the chisel or plane iron being sharpened. This adaptability makes them a practical choice for workshops with diverse tool collections.
They can handle both straight-edged and slightly curved blades effectively, providing a broader range of applications. While potentially not excelling in any single area as much as dedicated guides, their flexibility and convenience appeal to woodworkers who value a single, multi-purpose sharpening solution. They represent a good balance between cost and functionality.

Essential Sharpening Tools
Beyond a honing guide, successful chisel sharpening requires quality honing stones, lapping plates, and precise angle indicators for optimal results.
Honing Stones (Diamond, Water, Oil)
Selecting the right honing stone is vital when using a honing guide for chisel sharpening. Diamond stones cut aggressively, ideal for initial sharpening and repairing damaged edges, offering fast material removal. Water stones, known for their cooling properties, prevent overheating and produce a very fine edge, requiring consistent soaking;
Oil stones, a traditional choice, provide a slower but controlled sharpening process, needing regular oil application. The grit progression – from coarse to fine – is key; starting with a coarser grit to establish the bevel, then moving to finer grits for polishing. Each stone type demands different techniques and maintenance, impacting the final sharpness and longevity of your chisel edge.
Lapping Plates
Lapping plates, often used with diamond compounds, provide an exceptionally flat surface for achieving a mirror polish during chisel sharpening with a honing guide. These plates are crucial for removing microscopic burrs and refining the edge geometry established by honing stones. They ensure consistent contact between the chisel and the abrasive, leading to a supremely sharp and refined cutting edge.
Using a lapping plate elevates the sharpening process beyond basic honing, offering a level of precision beneficial for fine woodworking. Regular use extends chisel life and improves cutting performance, making them a valuable addition to any sharpening setup.
Angle Indicators
Angle indicators are vital when using a honing guide for chisel sharpening, ensuring consistent and repeatable bevels. Maintaining the correct angle is paramount for optimal performance; variations can lead to ineffective cutting or premature dulling. Many honing guides incorporate built-in angle adjustments and visual references.
Separate digital or mechanical angle gauges can further enhance precision, especially when experimenting with different bevels for specific tasks. Accurate angle setting minimizes guesswork and maximizes the effectiveness of each sharpening session, resulting in consistently sharp chisels ready for detailed woodworking projects.

Setting Up Your Honing Guide
Proper setup involves securely clamping the chisel blade, precisely adjusting the desired sharpening angle, and verifying correct alignment before beginning the honing process.
Securing the Chisel Blade
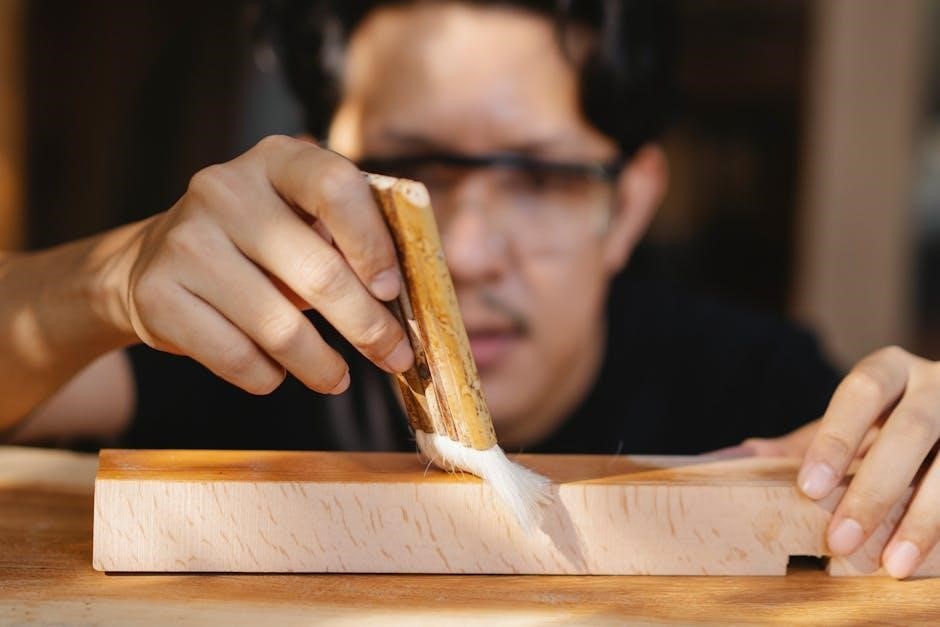
Effectively securing the chisel blade within the honing guide is paramount for consistent sharpening. Most guides utilize a clamping mechanism – side clamps or roller systems – to hold the blade firmly in place. Ensure the chisel is seated correctly, with the bevel facing the intended sharpening direction.
Tighten the clamping knob or mechanism sufficiently to prevent any movement during honing, but avoid over-tightening, which could potentially damage the blade. A secure hold minimizes vibration and ensures even pressure distribution across the bevel. Regularly check the tightness throughout the sharpening process, especially with prolonged use, to maintain optimal stability and accuracy. Proper blade security is foundational for achieving a sharp, reliable edge.
Adjusting the Sharpening Angle
Precisely adjusting the sharpening angle is critical for chisel performance. Honing guides allow for repeatable angle settings, crucial for maintaining consistent edge geometry. Most guides feature a mechanism to incrementally adjust the angle, often indicated by degree markings.

Select the desired angle based on the chisel’s intended use – lower angles for finer work, higher angles for heavier tasks. Securely lock the angle setting after adjustment to prevent slippage during honing. Double-check the alignment with an angle indicator for added accuracy. Consistent angle control ensures a durable, effective cutting edge tailored to your specific woodworking needs.
Ensuring Proper Alignment
Maintaining perfect alignment between the chisel blade, honing guide, and sharpening stone is paramount. Misalignment leads to uneven sharpening and a compromised edge. Carefully position the guide on the stone, ensuring the blade remains flat and stable throughout the process.
Regularly check for any wobble or movement during honing. Utilize a keen eye and gentle pressure to maintain consistent contact. Proper alignment guarantees a symmetrical bevel, maximizing the chisel’s cutting efficiency and longevity. A well-aligned setup minimizes errors and delivers professional-quality sharpening results every time.

The Sharpening Process
Sharpening involves a progression from coarse to fine grits, refining the edge. Guides ensure consistent angles, while polishing creates a razor-sharp, durable cutting surface.
Initial Grinding (If Necessary)
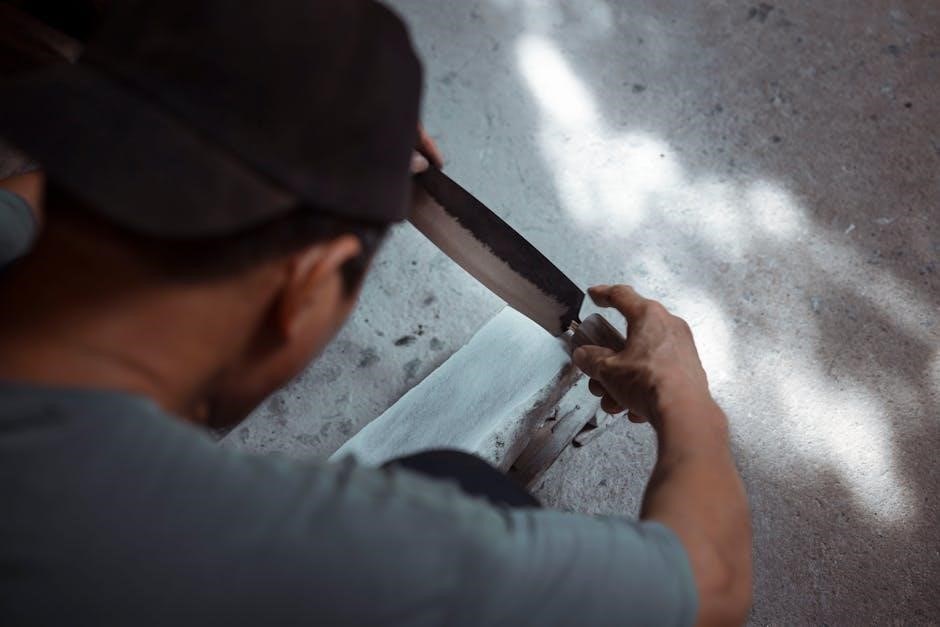
Before honing, severely dull or damaged chisels may require initial grinding to reshape the bevel. This step removes significant metal, restoring a workable edge profile. A slow-speed grinder, utilizing a coarse grit wheel, is ideal for this process.
Always prioritize safety, wearing appropriate eye protection and using a steady hand. Maintain a consistent angle during grinding, mirroring the desired honing angle. Avoid overheating the steel, as this can alter its temper. Frequent, light passes are preferable to aggressive material removal.
Following grinding, the chisel will likely have scratches and imperfections. These will be addressed during the subsequent honing stages, progressing through finer grits to achieve a polished, sharp edge. The honing guide then becomes essential for consistent angle maintenance.
Coarse Grit Sharpening
With the chisel secured in the honing guide, begin with a coarse grit stone – typically around 220 to 400 grit. This stage rapidly establishes the primary bevel and removes any remaining imperfections from initial grinding. Apply consistent, moderate pressure, maintaining the angle set on the guide.
Work the entire length of the bevel, ensuring even material removal. Alternate sides with each pass, counting strokes to maintain symmetry. Diamond stones excel at this stage due to their aggressive cutting action. Water or oil lubrication is crucial, preventing clogging and reducing heat.
Inspect frequently to monitor progress. The goal isn’t a razor edge yet, but a consistent bevel that reaches the very edge of the chisel. This forms the foundation for subsequent, finer honing stages.
Medium Grit Sharpening
Following coarse grit sharpening, transition to a medium grit stone, generally between 600 and 1000 grit. This refines the bevel established earlier, removing scratches and preparing the edge for finer honing. Maintain the same angle as before, diligently using the honing guide for consistency.
Reduce pressure slightly compared to the coarse grit stage. Focus on smooth, even strokes, again alternating sides with each pass. This stage is about refinement, not rapid material removal. Water or oil lubrication remains essential for optimal performance and stone longevity.
Regularly inspect the edge, looking for diminishing scratches and a more refined bevel. The goal is a consistently smooth surface, ready for the final polishing stages.
Fine Grit Honing and Polishing
Transitioning to fine grits (1000 grit and above), the focus shifts from shaping to polishing. Diamond honing blocks or water stones are excellent choices here. Maintain the established angle with the honing guide, using very light pressure and numerous passes.
Polishing removes the final microscopic scratches, creating a razor-sharp edge. Some woodworkers progress through multiple fine grits, culminating in a leather strop charged with polishing compound. This final step aligns the edge’s micro-structure.
Test sharpness frequently – a properly honed chisel should cleanly shave hair. Remember, patience is key; rushing this stage compromises the final result. A truly sharp chisel dramatically improves woodworking accuracy and enjoyment.

Maintaining Your Chisels
Regular honing preserves chisel sharpness, preventing excessive wear. Protect blades from rust with a light oil coating after each use for longevity.
Regular Honing
Consistent honing is paramount for maintaining peak chisel performance. Even with careful use, the edge will gradually dull, impacting cut quality and requiring more force. Frequent, light honing sessions – perhaps before each use or after a short project – are far more effective than infrequent, aggressive sharpening;
A honing guide ensures consistent angle maintenance during these sessions. Utilizing diamond stones or lapping plates, coupled with the guide, quickly restores a keen edge. This proactive approach minimizes the need for extensive grinding, preserving the chisel’s original geometry and extending its lifespan. Remember, a sharp chisel is a safe chisel, requiring less effort and reducing the risk of slips.
Preventing Rust and Corrosion
Protecting your chisels from rust and corrosion is vital for longevity, even after meticulous sharpening with a honing guide. Moisture is the primary culprit, so thoroughly dry chisels after each use. A light coating of oil – honing oil, camellia oil, or even mineral oil – creates a protective barrier against humidity.
Proper storage is also key. Avoid storing chisels loosely in a drawer where they can rub against other tools. Utilize a chisel rack or roll to keep blades separated and protected. Regularly inspect your chisels for any signs of rust, addressing them promptly with a rust remover or fine steel wool before honing.

Troubleshooting Common Issues
Uneven sharpening or difficulty maintaining the angle often arises from improper setup or inconsistent pressure during honing with a guide.
Chisel Not Sharpening Evenly
If your chisel isn’t sharpening evenly while using a honing guide, several factors could be at play. First, ensure the chisel blade is securely clamped within the guide; any movement will cause inconsistencies. Verify the guide is firmly fixed to the sharpening stone, preventing shifting during strokes.
Consistent downward and lateral pressure are vital. Avoid applying more force on one side of the blade than the other. Also, inspect your sharpening stone for uneven wear, which can lead to uneven sharpening. Finally, double-check the alignment of the honing guide with the stone – even a slight misalignment can cause an uneven edge. Correcting these issues will yield a uniformly sharp chisel.
Difficulty Maintaining Angle
Struggling to maintain a consistent sharpening angle with a honing guide is a common issue, especially for beginners. Ensure the guide’s angle adjustment mechanism is locked securely before beginning. Regularly check the angle during sharpening; slight bumps can alter the setting.
Practice smooth, controlled strokes, focusing on keeping the guide flat against the stone. Avoid excessive pressure, which can cause the chisel to lift or the guide to shift. If using a side-clamping guide, confirm the chisel is seated flush against the guide’s reference surface. A stable setup and deliberate technique are key to consistent angle maintenance.